

Laws and guidance checked November 2026
The hour you spend checking a rental on move-in day is the hour that protects your deposit when you leave. Damage that isn’t recorded at the start can end up looking like yours at the end. This move-in checklist takes you room by room, shows you how to photograph the place so the photos actually count, and explains the deadlines for reporting problems in the US and UK.
Quick answer
Before you unpack, photograph and video every room, wide and close-up. Test the appliances, taps, drains, windows, locks, heating and smoke alarms. Read the meters and count the keys. Then check the landlord’s inventory or condition report, add anything missing, and send your corrections in writing within the deadline: often 7 days in the UK, and 15 days in Massachusetts, for example.
The De Auditor’s Tip
Do the walk-through before the first box comes through the door. Once the furniture is in, you can’t see the marks behind the sofa or under the bed, and you can’t prove they were there before you.
What you need on move-in day
- Your phone, fully charged, with the date and time showing on photos (or turn on the date stamp in your camera app).
- A tape measure or a coin, to show the size of marks in close-ups.
- The landlord’s inventory, check-in report or condition statement, if you have one.
- A printed copy of our free checklist (at the end of this guide) and a pen.
- About 60 to 90 minutes for a one-bedroom apartment.
Step 1: Photograph everything, the right way
Photos are your best evidence, but only if they show the date and the detail. Shoot every room in the same order:
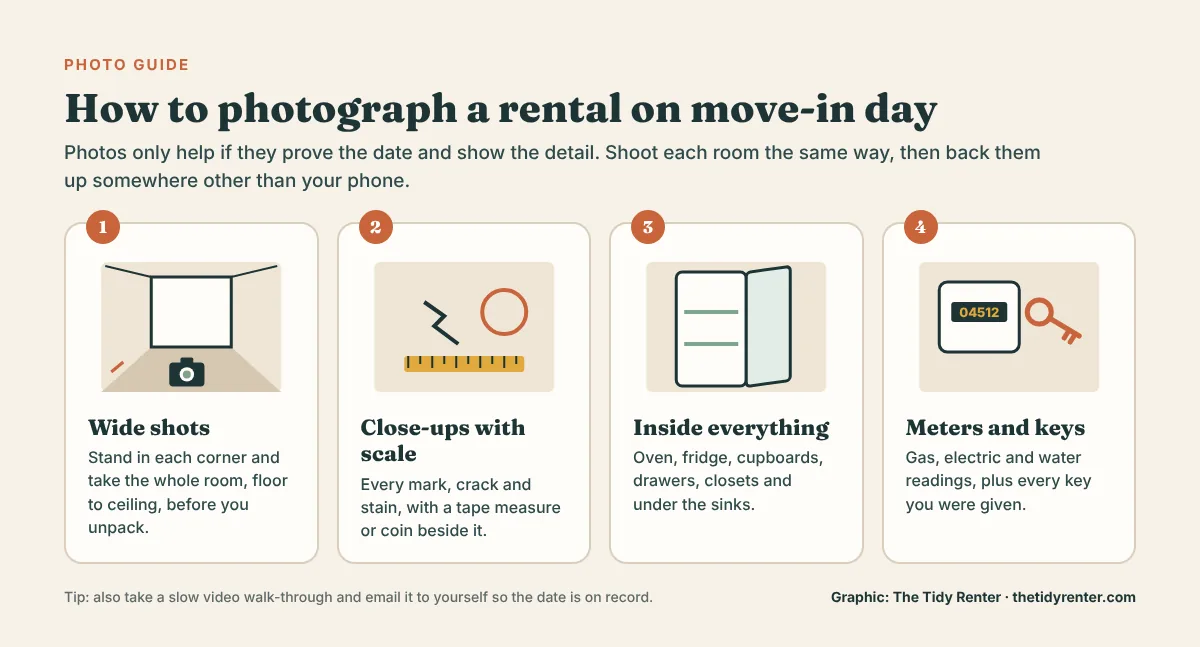
- Wide shots: stand in each corner and take the whole room, floor to ceiling.
- Close-ups: every mark, crack, stain, chip and scratch, with a tape measure or coin beside it so the size is clear.
- Inside everything: the oven, fridge, freezer, cupboards, drawers, closets and the space under the sinks.
- Meters and keys: gas, electricity and water readings, and every key, fob and remote you were given.
Then take a slow video walk-through with a running commentary (“small scratch on the bedroom door, left side”). Email the photos and video to yourself, or upload them to cloud storage, the same day. That creates a dated record that doesn’t depend on your phone.

The De Auditor’s Note
Christian, founder of The Tidy Renter
The photos I’d want most in a deposit dispute are the boring ones: the clean oven, the carpet in the corner, the inside of the fridge. People photograph the obvious damage and forget the cleanliness, and cleaning is where most deposit arguments end up.
Step 2: Check each room
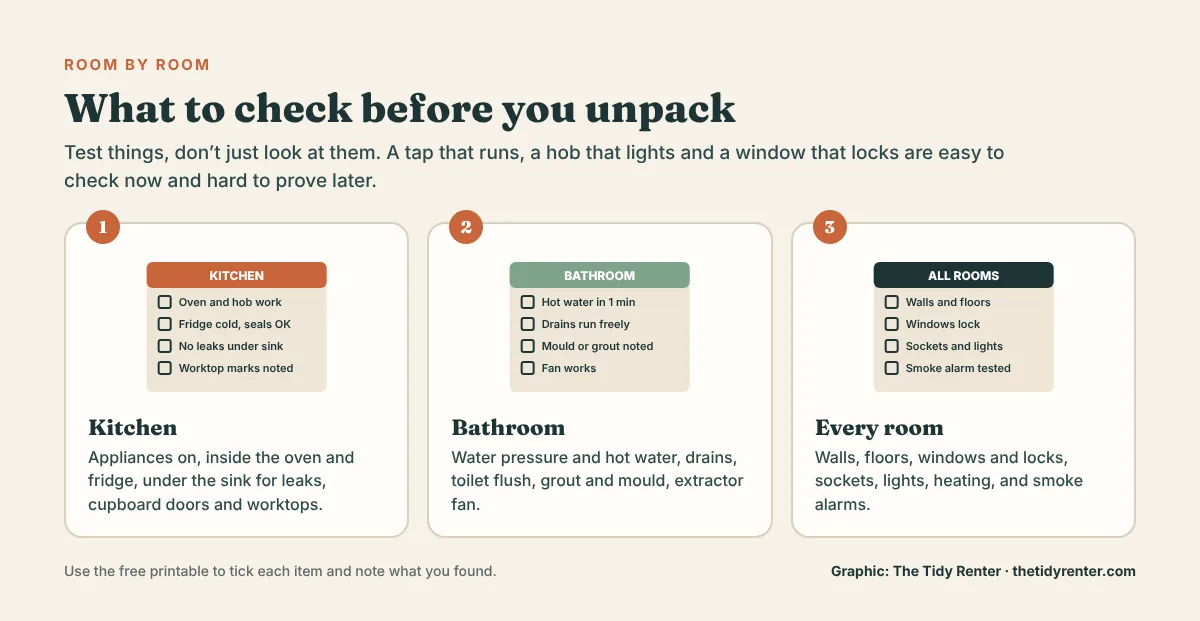
Look, but also test. A tap that runs, a hob that lights and a window that locks are easy to check now and hard to prove later.
Kitchen
- Turn on the oven, every hob ring, the extractor fan and the microwave.
- Check the fridge and freezer are cold, the seals aren’t torn and the shelves and drawers are all there.
- Run the taps and look under the sink for drips, damp or a warped cupboard floor.
- Open every cupboard and drawer. Note loose hinges, chips and stains on worktops.
- Run the dishwasher or washing machine on a short cycle if you can, or at least check they power on.
Bathroom
- Check how long the hot water takes, and the water pressure in the shower and taps.
- Fill the sink and bath a little and watch them drain. Flush the toilet and check it refills properly.
- Look for mould on the ceiling, in the grout and along the sealant. Photograph it now, or it may be blamed on you.
- Switch on the extractor fan and check it pulls air.
Living room and bedrooms
- Walls and ceilings: scuffs, nail holes, cracks, stains and patches of different paint.
- Floors and carpets: stains, burns, worn patches, scratches in wooden or laminate floors.
- Windows: open, close and lock each one. Check blinds and curtains work.
- Doors: every door closes and latches, and every lock works with the keys you have.
Throughout the home
- Plug something small into each socket, and try every light switch.
- Turn the heating on, even in summer, and check every radiator or vent warms up.
- Test the smoke alarms. Oregon’s State Fire Marshal advises testing smoke alarms every month and replacing them every 10 years (Oregon State Fire Marshal). If one doesn’t work, tell your landlord in writing straight away.
- Check for a carbon monoxide alarm if there’s a gas boiler, fire or cooker.
Step 3: Check the inventory or condition report
Most landlords give you a written record of the property’s condition. Read it line by line against what you see, not just the summary.
- Is everything listed actually there? Furniture, appliances, blinds, smoke alarms and keys.
- Is the condition right? “Good condition” next to a stained carpet needs correcting.
- Is the cleanliness right? If the oven isn’t clean, say so now, or you may be asked to pay for cleaning it when you leave.
- Do the photos match? Inventory photos should be dated and show the same condition you see.
Write your corrections clearly, attach your own photos, and send them by email so there’s a record. Don’t sign an inventory you disagree with until it’s corrected. Shelter advises signing and dating it only once you’re satisfied it’s accurate, and keeping a copy (Shelter).
The De Auditor’s Tip
Name your photo files by room and problem, like “kitchen-oven-door-scratch.jpg”, and number them in your correction email. When you need them months later, you’ll find the right one in seconds instead of scrolling through 300 pictures.
US rules: checklists, photos and deadlines
Move-in rules depend on your state, so check yours. Some examples:
- Massachusetts: a landlord who takes a deposit must give you a signed statement of the apartment’s condition, either when the deposit is paid or within 10 days of the tenancy starting. You have 15 days to return it with your own list of damage. If you don’t, a court may treat the landlord’s list as complete and correct (Mass.gov).
- Washington: to collect a deposit, the landlord must give you a written lease and a move-in checklist describing the condition, which you sign and date. You get a copy (WashingtonLawHelp).
- California: for tenancies starting on or after July 1, 2025, landlords must photograph the unit at or just before the start of the tenancy (SF.gov). Take your own photos anyway.
Even where the law doesn’t require a checklist, send your landlord a written list of problems in the first week. It costs nothing and it’s the best evidence you’ll have.
UK rules: inventories, deposits and documents
- The inventory: your landlord doesn’t have to provide one, but most do. Maidstone Borough Council advises reading it and reporting any differences within seven days of moving in, and says both landlord and tenant should sign it (Maidstone Borough Council). If there’s no inventory, make your own with dated photos and send it to the landlord.
- Your deposit: in England and Wales it must be protected in a government-approved scheme within 30 days, and you should get the certificate and information about the scheme.
- Documents you should receive in England: the How to Rent guide, the Energy Performance Certificate (EPC), the gas safety certificate (if there’s gas) and the Electrical Installation Condition Report (EICR). A working smoke alarm is required on every floor (Basingstoke and Deane Borough Council).

The De Auditor’s Note
Christian, founder of The Tidy Renter
If your landlord’s inventory says “professionally cleaned” and the oven tells a different story, don’t argue about it on the doorstep. Photograph it, write one polite line in your correction email, and move on. That single line is often what decides who pays for the end-of-tenancy clean.
Step 4: Report problems in writing
Send one email within your first week with:
- A list of every problem, by room.
- Photo references for each one.
- Anything that needs repairing (a broken lock, a leak, a dead smoke alarm), marked clearly as a repair request.
- A request that the landlord confirms they’ve received it.
Keep the email, the replies and your photos together in one folder for the whole tenancy. Our guide to normal wear and tear vs damage explains how this evidence is used when you move out.
Mistakes to avoid
- Unpacking first. Furniture hides damage, and you’ll never photograph behind it later.
- Only photographing damage. Photograph clean things too: the oven, fridge, carpets and windows.
- Signing an inventory you disagree with. Correct it in writing first.
- Reporting problems by phone only. If it isn’t in writing, it didn’t happen.
- Keeping photos only on your phone. Back them up the same day.
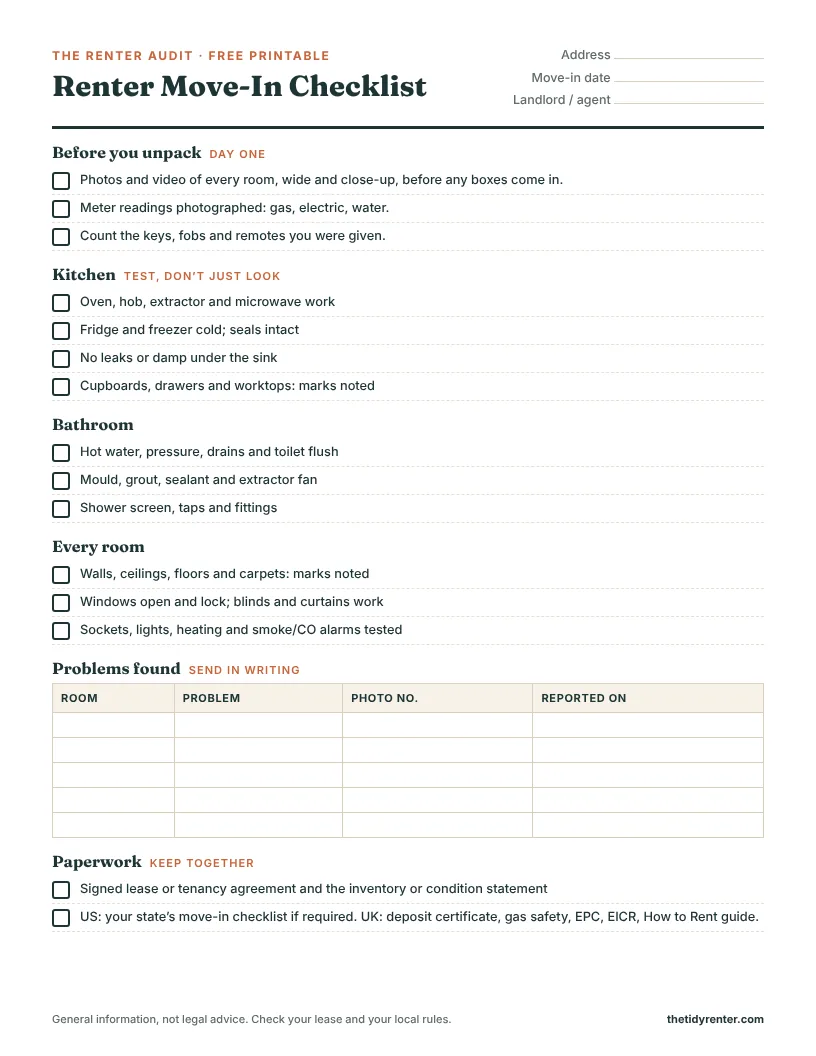
Free printable: Download the Renter Move-In Checklist (PDF). Print it, tick each item as you go, and use the table to log every problem you report.

The De Auditor’s Note
Christian, founder of The Tidy Renter
Every time I’ve moved, the first thing I do is photograph every wall, floor and fitting before a single box comes in. Those photos have saved me from deposit arguments more than once. Take them, back them up, and email a copy to your landlord the same day.
Frequently asked questions
What should I check when moving into a rental?
Walls, floors and ceilings for damage; appliances, taps, drains and toilet; windows, doors and locks; sockets, lights and heating; and smoke and carbon monoxide alarms. Photograph everything before you unpack.
How long do I have to report damage after moving in?
It depends on where you live and your lease. In Massachusetts it’s 15 days after receiving the statement of condition. UK councils often advise reporting inventory problems within seven days. If in doubt, report in the first week.
Should I take photos when I move into an apartment?
Yes. Dated photos and a video walk-through are your best evidence if there’s a dispute about your deposit. Include wide shots, close-ups with something for scale, and the inside of appliances and cupboards.
What if my landlord doesn’t give me a move-in checklist?
Make your own using the printable, attach your photos, and email it to your landlord. Keep a copy and the email. In Massachusetts and Washington, landlords taking a deposit are required to provide one.
Can my landlord charge me for damage that was already there?
They shouldn’t, but you may need to prove it was there. That’s exactly what your move-in photos and written report are for.
Do I have to pay for a check-in inventory in the UK?
No. Landlords and letting agents in England can’t charge tenants for inventories. You can pay for your own independent inventory, but you’re unlikely to get that money back.
The bottom line: photograph first, test everything, correct the inventory in writing, and keep it all in one place. One careful hour on move-in day is the best deposit insurance you’ll ever have.
Related guides on The Tidy Renter
- Normal Wear and Tear vs Damage: What Landlords Can Charge: how your move-in evidence is used at move-out.
- How to Remove Command Strips Without Damaging Paint: take hooks down at move-out without marking the walls.
- How to Declutter Your Home: A Room-by-Room Plan: move in with less.
- How to Hang Things Without Damaging Rental Walls: settle in without risking the deposit.
Update log
- November 2026: First published. Laws and guidance checked.
Sources
- Mass.gov: mandatory statement of condition
- WashingtonLawHelp: deposits and damages
- SF.gov: security deposit photograph requirements
- Shelter England: how to check and agree an inventory
- Maidstone Borough Council: inventory lists
- Basingstoke and Deane Borough Council: legal duties as a landlord
- Oregon State Fire Marshal: smoke and CO alarms
Images: all graphics and the printable in this guide were designed by The Tidy Renter. No AI-generated images are used.
This guide is general information, not legal advice. Rules vary by state and country; check your lease and local law.