

Checked November 2026
Command strips are the renter’s favourite way to hang things without nails, but they only live up to “damage-free” if you take them off the right way. Pull the tab towards you, rush it, or pry off a hook with a broken tab, and you can take a patch of paint with it. This guide shows you the correct way to remove Command strips, what to do when the tab snaps, how to clear any sticky residue, and how to fix the wall if paint does lift, before your landlord sees it.
Quick answer
Take everything off the hook. Hold the hook lightly, then stretch the tab slowly straight down along the wall, not towards you, for 12 in (30 cm) or more until the strip lets go. If the tab breaks, warm the strip with a hair dryer and saw through the foam with dental floss. Never pry the hook off the wall. Roll off any residue with your fingertip, then wipe with mild soapy water.
The De Auditor’s Tip
Do a test removal on one strip in a hidden spot, like behind a wardrobe or inside a closet, before you do the whole flat. If the paint lifts there, you know your walls need the slower, warmer method, and you haven’t marked the living room.
Why Command strips sometimes take paint with them
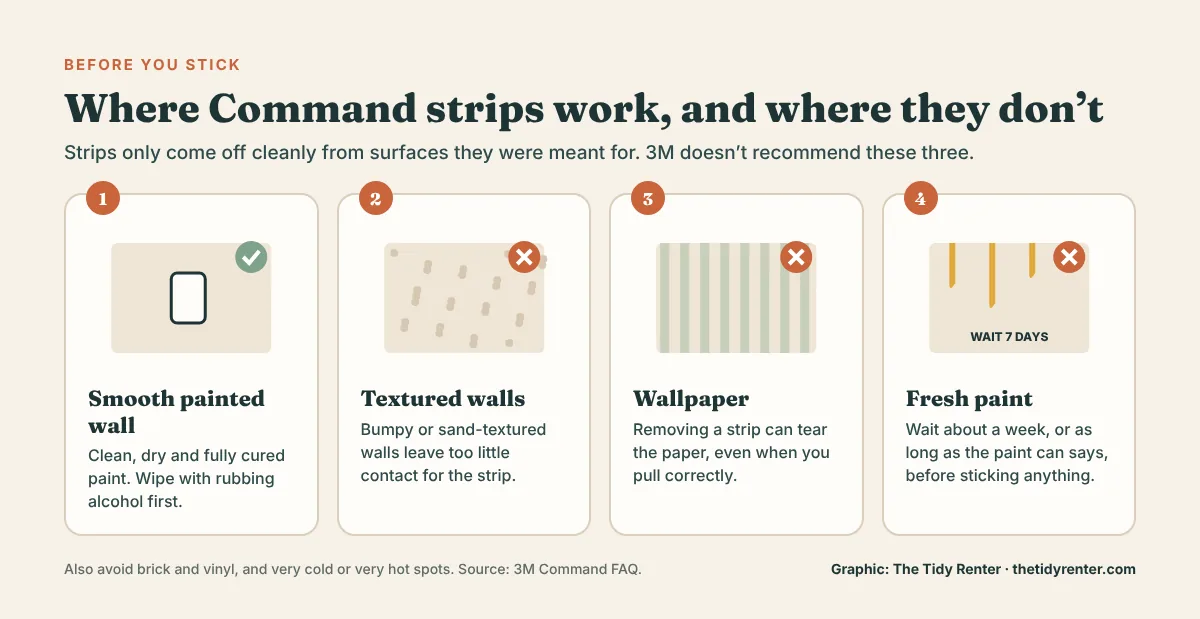
Command strips use a stretch-release adhesive. When you stretch the tab along the wall, the adhesive thins out and lets go. When you pull it away from the wall instead, the adhesive grips the paint and peels it off. 3M’s own guidance is clear: don’t pull the strip towards you; stretch it slowly straight down, at least 12 inches (3M Command FAQ).
Paint damage is also more likely when:
- The paint was fresh when the strip went up. 3M says to wait until paint has fully cured, about a week, or as long as the paint can says.
- The wall is textured, wallpapered, brick or vinyl. 3M doesn’t recommend these surfaces.
- The paint is weak or flaky, or was painted over dust or grease, so it isn’t well stuck to the wall in the first place.
- The strip has been in a hot, sunny spot. Very high heat can change how the adhesive behaves.
How to remove Command strips: step by step
| Renter Audit | |
|---|---|
| Cost | Free |
| Deposit risk | Very low if you go slowly |
| Payoff | Clean walls at move-out |
| Effort | 1 to 2 minutes per strip |
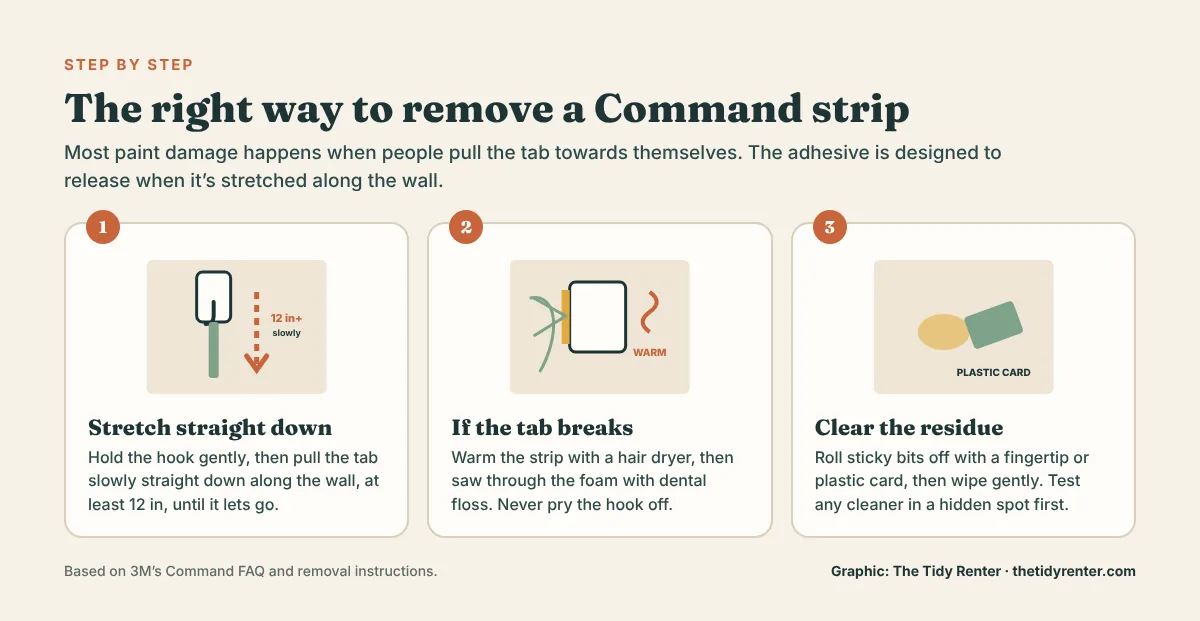
- Take everything off the hook. Lift pictures and hooks up and off rather than pulling them outwards.
- Find the tab. It’s the plain end of the strip that doesn’t stick, usually at the bottom of the hook or frame.
- Hold the hook gently. Steady it with one hand so it doesn’t snap back at your fingers, but don’t press it into the wall.
- Stretch the tab straight down, keeping it flat against the wall. Pull slowly and steadily. The tab can stretch to 12 in (30 cm) or longer before the strip releases. That’s normal.
- Keep going until it lets go. Don’t switch to pulling outwards halfway through, even if it feels slow.
Picture-hanging strips come in interlocking pairs, one on the frame and one on the wall. Take the frame off first: 3M’s instructions say to grab the bottom corners and peel the frame away from the wall, not pull it straight off (3M picture strip instructions). Then remove each strip on the wall by stretching its tab straight down, and do the same with the strips left on the back of the frame.
How far to stretch: hooks, picture strips and poster strips
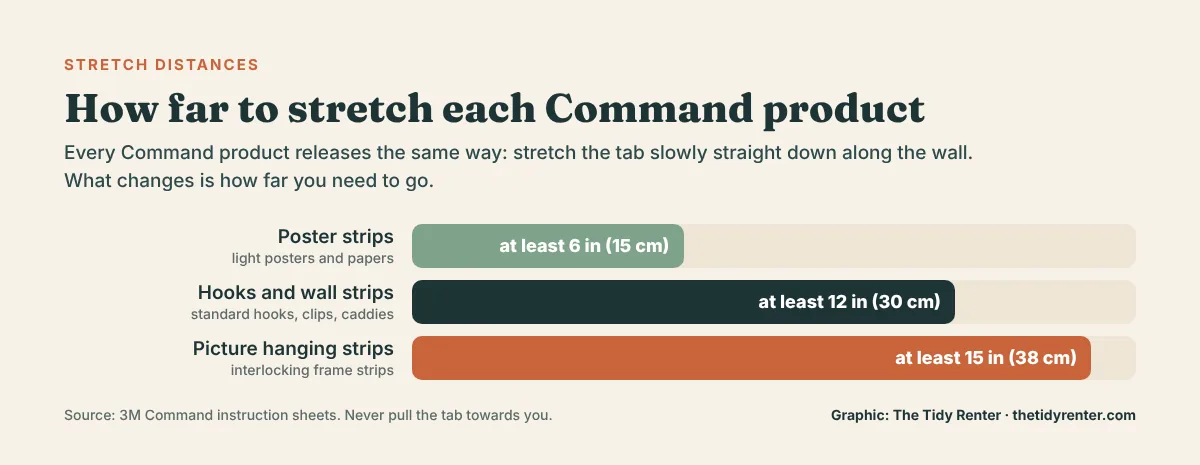
Every Command product lets go the same way, but the distance changes. 3M’s instruction sheets give these minimums:
- Poster strips: at least 6 in (15 cm).
- Hooks and wall strips: at least 12 in (30 cm).
- Picture-hanging strips: at least 15 in (38 cm).
If the strip still grips when you reach that length, keep stretching slowly. Stopping early and tugging is what snaps tabs.
If you can’t see the tab
On most Command hooks the strip sits under a mounting base, and the hook clips over it. Slide the hook up and off the base and the tab shows at the bottom (3M UK how-to guide). Clear strips are harder to spot: look for the short clear tab at the bottom edge and lift it with a fingernail. If there really is no tab, or it’s buried behind something heavy, use the warm-and-floss method below.

The De Auditor’s Note
Christian, founder of The Tidy Renter
The mistake I see most often is impatience. The tab stretches much further than people expect, so they think it isn’t working and start pulling it towards themselves. That’s exactly the moment paint comes off. If it feels like it’s taking too long, you’re probably doing it right.
What to do if the tab breaks
| Renter Audit | |
|---|---|
| Cost | Free: a hair dryer and dental floss |
| Deposit risk | Low if you don’t pry |
| Payoff | Saves you from a gouged wall |
| Effort | 5 minutes |
Tabs snap when they’re pulled too hard or at an angle. Don’t try to lever the hook off with a knife or a screwdriver; 3M warns that prying the bracket off causes damage (3M Command FAQ). Instead:
- Warm it. Point a hair dryer at the hook or strip for about 30 seconds to soften the adhesive. Keep the dryer moving. Avoid a heat gun, which can damage the wall (Hunker).
- Saw through the foam. Take about 8 in (20 cm) of dental floss or strong thread, hold it tight, and slide it behind the hook at the top. Saw gently back and forth, working down, keeping the floss as close to the wall as you can.
- Remove what’s left. Once the hook is off, there’s usually a thin layer of adhesive on the wall. If you can grip any edge, stretch it straight down. If not, roll it off with your fingertip.
How to remove sticky residue from painted walls
Most strips come off clean, but older or heat-softened ones can leave a sticky film. Start with the gentlest method and only move on if you need to:
- Roll it off with your fingertip. Rub in small circles and the residue balls up. This is the safest way on any paint.
- Use a plastic card. The edge of an old gift card or a plastic scraper lifts the rest. Keep it nearly flat to the wall.
- Wipe with mild soapy water on a soft cloth, then dry.
- Only then, try a cleaner. Rubbing alcohol or a citrus-based adhesive remover can work, but test it in a hidden spot first. Glossier paints handle scrubbing well; flat and matte paint is easily marked, so go gently (Hunker). 3M also notes that isopropyl alcohol can dull fresh paint.
The De Auditor’s Tip
Skip the magic eraser on matte walls. It’s a fine abrasive, so it can leave a shiny, scrubbed patch on flat paint that’s more noticeable than the mark you were cleaning. Soapy water and a soft cloth first, every time.
Removing Command strips from tile, glass, wood and wallpaper
3M says the adhesive holds on wood, tile and glass as well as painted walls, but it doesn’t recommend wallpaper or vinyl (3M UK). The removal is the same everywhere: stretch the tab straight down. What changes is what can go wrong.
| Surface | Risk | What to do |
|---|---|---|
| Glazed ceramic tile | Low | Stretch the tab down. Wipe any residue off with rubbing alcohol on a cloth. Keep scrapers off the grout. |
| Glass and mirrors | Low | Stretch the tab down and clean residue with rubbing alcohol. On a mirror, don’t let cleaner run behind the edges. |
| Painted or varnished wood (doors, cupboards) | Medium | Treat it like a painted wall: slow and straight down, warmed first if the strip is old. Test any cleaner in a hidden spot, because solvents can dull a finish. |
| Wallpaper and vinyl | High | Not recommended by 3M. Warm the strip, stretch very slowly, and stop if the paper starts to lift; switch to the floss method. |
If paint came off: how to fix the wall
| Renter Audit | |
|---|---|
| Cost | About $10 to $25 for spackle, sandpaper and a small brush, plus paint |
| Deposit risk | Reduces it. A neat repair is usually cheaper than a landlord’s charge |
| Payoff | Medium |
| Effort | 1 to 2 hours, plus drying |
If a small patch of paint lifted, you can often repair it so it’s hard to spot. If the paper face of the drywall came off too, it needs a little more work.
- Trim loose edges. Cut away any loose flakes of paint or drywall paper with a sharp craft knife so the edge is flat.
- Fill. Apply a thin layer of lightweight spackle with a putty knife, let it dry, and sand smooth with fine sandpaper.
- Prime if needed. Benjamin Moore advises priming only where the drywall itself is damaged (Benjamin Moore).
- Touch up with matching paint. Ask your landlord or building manager for the paint brand, colour and sheen; many keep a record. Use very little paint and work from the centre outwards, feathering the edges.
Flat and matte finishes are much easier to touch up than glossy ones. If you can’t match the colour and sheen, a visible patch can look worse than the original mark, so it may be better to tell your landlord and let them decide.

The De Auditor’s Note
Christian, founder of The Tidy Renter
If you pull off a patch of paint, be upfront about it. Most landlords would rather you said “I took a bit of paint off here, can you tell me the colour so I can fix it?” than find a badly matched patch at the end. An honest small repair is almost always cheaper than a repaint charge.
Is a mark from a Command strip wear and tear or damage?
It depends on the size and the circumstances. A tiny, barely visible mark is often treated like the small nail holes that come with normal living. A large patch of missing paint or torn drywall paper is more likely to be classed as damage, and a landlord can charge a fair share of the repair. Our guide to normal wear and tear vs damage explains how deposit disputes are decided in the US and UK.
Check your lease too. Some tenancy agreements ban adhesive hooks and strips altogether, and some UK agreements specifically mention them.
Taking down every strip before move-out
- Count them. Walk each room and note every hook, strip and clip, including inside closets and behind doors. One forgotten hook is enough for a deduction.
- Start a few days early, not on moving day. A broken tab or a touch-up that has to dry takes time.
- Warm a cold room. 3M rates the adhesive for use between 50°F and 105°F (10°C to 40°C). If the heating has been off, warm the room, or each strip with a hair dryer, before you start.
- Photograph each wall afterwards. Dated photos of clean walls back you up if the deposit is questioned. Our move-in checklist for renters shows how to photograph a rental properly.
How to avoid problems next time
- Wipe the wall with rubbing alcohol before sticking, and let it dry. Grease and dust are the main reasons strips fail.
- Press firmly for 30 seconds and wait an hour before hanging anything.
- Stay within the weight limit printed on the pack, and don’t mix strips from different packs.
- Avoid steamy and very hot spots, like right above a kettle, radiator or in direct summer sun.
- Use the right size. Larger strips hold more, but they also have more adhesive to release, so they’re slower to remove.
For heavier things like mirrors and shelves, see our guide on how to hang things without damaging rental walls.
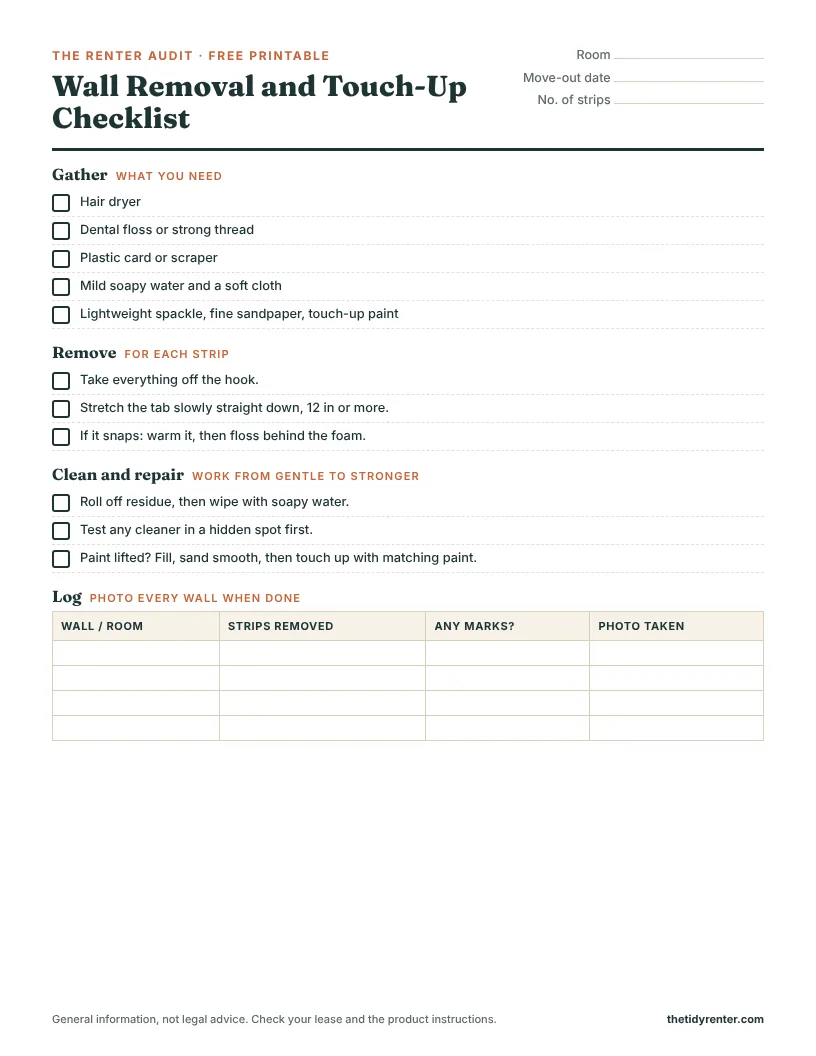
Free printable: Download the Wall Removal and Touch-Up Checklist (PDF). It lists the tools you need, the removal steps, the repair order and a log to photograph each wall before you hand back the keys.
Frequently asked questions
Do Command strips damage walls?
Not usually, if they’re used on smooth, cured paint and removed by stretching the tab straight down. Damage happens when the tab is pulled outwards, the paint is fresh or weak, or the strip is pried off after the tab breaks.
Which way do you pull Command strips?
Straight down along the wall, slowly, for 12 in (30 cm) or more. Never pull the tab towards you or away from the wall.
How do you remove a Command strip when the tab breaks?
Warm it with a hair dryer for about 30 seconds, then slide dental floss behind the hook and saw gently through the foam. Roll off any adhesive left on the wall with your fingertip.
How do you get Command strip residue off a wall?
Roll it off with your fingertip, lift the rest with a plastic card, then wipe with mild soapy water. Try rubbing alcohol or a citrus cleaner only after testing in a hidden spot.
How do you remove Command hooks?
Slide the hook up off its base, then stretch the tab of the strip underneath straight down along the wall for at least 12 in (30 cm). Never twist or lever the base off.
How do you remove Command picture-hanging strips?
Grab the bottom corners of the frame and peel it away from the wall. Then stretch each wall strip straight down for at least 15 in (38 cm).
Can you use Goo Gone on painted walls?
It can work, but test it in a hidden spot first. Start with your fingertip and soapy water, and only use a citrus cleaner if residue stays.
Can you reuse Command strips?
No. Each strip is designed for one use. Use a new strip each time you rehang something, and keep spare strips that match your hooks.
How long should paint dry before using Command strips?
3M suggests waiting about a week for paint to fully cure, or longer if the paint can says so.
The bottom line: empty the hook, stretch the tab slowly straight down, and never pry. Warm and floss a broken strip, roll off the residue, and if paint does lift, fix it neatly with matching paint before you move out.
Related guides on The Tidy Renter
- How to Hang Things Without Damaging Rental Walls: every no-drill way to hang art, mirrors and hooks.
- Normal Wear and Tear vs Damage: What Landlords Can Charge: how marks and holes are judged at move-out.
- Renter-Friendly Decor Ideas That Won’t Cost Your Deposit: decorate without touching the walls.
Update log
- October 2026: First published.
- November 2026: Added stretch distances for each Command product, hidden tabs, tile, glass and wood, and a move-out plan.
Sources
- 3M: Command strips FAQ (PDF, hosted by Mattel)
- Bob Vila: how to remove Command strips
- Hunker: how to remove a broken Command strip
- Hunker: how to remove tape residue from walls
- Benjamin Moore: how to touch up paint
- 3M UK: Command how-to guide
- 3M: Command picture hanging strips instructions (PDF)
Images: all graphics and the printable in this guide were designed by The Tidy Renter. No AI-generated images are used. Command is a trademark of 3M; The Tidy Renter is not affiliated with 3M.
This guide is general information. Always follow the instructions on your product’s packaging.